• Nvis Technology
  • Nvis Technology
  • Nvis Technology
  • Nvis Technology
  • Nvis Technology
  • Nvis Technology
Nvis Technology

Head Office

141-A, Electronic complex, Pardesipura,Indore - 452010 India

Phone: +91 73899 00887 , +91 98932 70303

Email:info@nvistech.com

Request a Quote

Looking for a quality and affordable builder for your next project?


    Nvis Technology

    Toll Free

    +91 73899 00887

    We are happy to meet you during our working hours. Please make an appointment.

    • Monday-Saturday: 9:00 AM - 5:30 PM (IST)
    • Sunday: Closed

    LCR Meter Working Principle: How Inductance, Capacitance & Resistance Are Measured

    TL;DR –

    • This blog is written for electronics students, engineers, lab technicians, manufacturers, educators, and repair professionals who need accurate measurement of inductance, capacitance, and resistance in real-world applications.
    • An LCR meter measures L, C, and R by applying a known AC test signal and analyzing impedance, voltage, current, and phase angle instead of relying on simple DC measurement.
    • The lcr meter working principle is based on impedance analysis, where resistance and reactance (from inductance or capacitance) are separated using phase relationships.
    • By detecting whether current leads, lags, or stays in phase with voltage, the meter accurately identifies and calculates capacitance, inductance, or resistance values.
    • The digital LCR meter working principle improves accuracy and speed through digital signal processing, auto-ranging, and frequency selection, making it ideal for modern labs, R&D, and quality control.

    Related Blogs –


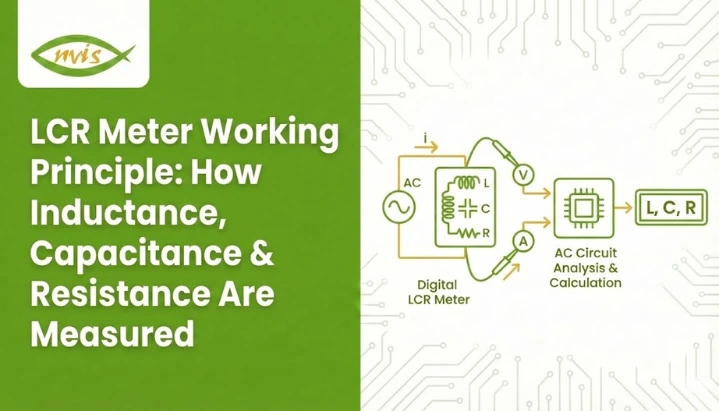
    An LCR meter is a sensitive instrument used to measure inductance (L), capacitance (C), and resistance (R) by applying an AC test signal and analyzing impedance, phase angle, voltage, and current. Understanding the LCR meter working principle enables engineers, technicians, students, and manufacturers to obtain accurate component measurements for testing, design, quality control, and troubleshooting. Precision is important whether you are testing a capacitor on a PCB, checking an inductor in a power supply, or verifying resistor tolerances in a production process.

    A LCR meter is a type of meter created to measure passive components with significantly higher precision than any ordinary multimeter. Although a multimeter can measure the value of resistance and approximately determine the value of capacitance, it cannot analyze frequency-dependent behavior or phase relationships, both of which are required of inductors and capacitors.

    What Does an LCR Meter Measure?

    We will discuss the working principle but first, it would be appropriate to take a quick review of the three parameters measured.

    Inductance (L)

    Resistance to varying currents in a magnetic field by storing energy in a component (usually a coil) is known as inductance. It is expressed in henries (H), and very frequency-dependent.

    Capacitance (C)

    The capacity of a component to store electrical energy in an electric field is called Capacitance. It is expressed in farads (F) and it depends on the frequency, temperature and dielectric material.

    Resistance (R)

    Resistance is the opposition to the flow of electric current and is expressed as ohms (Ω). Resistance is theoretically frequency-independent, in contrast to inductance and capacitance, but in practice, components exhibit parasitic effects.

    All three are measured on an LCR meter, which measures the behavior of a component when it is exposed to an AC signal.

    The LCR Meter Working Principle

    LCR meter working principle is based on measuring the impedance of a component when it is excited by a known AC test signal. Measuring the reaction of the component to this signal, that is, the value of both voltage and current, and the angle between them, the meter will precisely decide whether the component is a resistor, capacitor, or inductor, and compute its value.

    The principle of working of the LCR meter is impedance measurement which enables the instrument to analyze the response of a component to an alternating current (AC) signal.

    Impedance (Z) is the total opposition a circuit presents to alternating current. Unlike simple resistance in DC circuits, impedance consists of resistance (R) and reactance (X).

    • Resistance (R)
    • Reactance (X) from inductance or capacitance

    The fundamental relationship is:

    • Inductive reactance: XL = 2πfL
    • Capacitive reactance: XC = 1 / (2πfC)

    By applying a known AC signal and measuring:

    • Voltage (V)
    • Current (I)
    • Phase angle (θ) between them

    The LCR meter establishes whether the component is mostly a resistor, capacitor or inductor and calculates it.

    Nvis 9303T Digital LCR Meter – Overview

    The Nvis 9303T is a digital LCR meter designed for accurate measurement of passive electronic components like inductors (L), capacitors (C), and resistors (R). It’s typically used in quality control, incoming inspection of components, and automated test systems in industrial and laboratory environments. 

    Parameter

    Frequency

    Typical Range (example)

    Capacitance (C)

    1 kHz

    0.1 pF – 9999.9 pF


    10 kHz

    0.01 pF – 999.99 pF

    Inductance (L)

    1 kHz

    0.1 pH – 9999.9 H


    10 kHz

    0.01 pH – 999.99 H

    Dissipation / Quality

    All

    D: 0.0001 – 9.999, Q: 0.0001 – 9999


    How an LCR Meter Works: Step-by-Step

    When the lcr meter working process is divided into a logical sequence the process becomes much clearer. Each step is based on the LCR meter working principle of AC impedance measurement and phase analysis.

    1 AC Signal Generation

    The LCR meter generates a stable AC test signal using an internal oscillator. Common test frequencies include:

    • 100 Hz
    • 120 Hz
    • 1 kHz
    • 10 kHz
      Some advanced meters offer selectable or automatic frequency ranges.

    2 Applying the Test Signal to the Component

    The component under test (DUT) is connected using:

    • Two-terminal method (basic measurements)
    • Four-terminal (Kelvin) method for higher accuracy

    The four-terminal method eliminates errors caused by lead resistance and contact impedance.

    3 Measuring Voltage and Current

    Precision circuits inside the meter measure the voltage across and current through the component. These measurements form the basis of impedance calculation.

    4 Phase Angle Detection

    The phase difference between voltage and current reveals the component type:

    • 0° phase shift – Pure resistance
    • Current leads voltage – Capacitive behavior
    • Current lags voltage – Inductive behavior

    5 Parameter Calculation and Display

    Using digital signal processing, the meter calculates L, C, or R and displays the value on the screen, often along with:

    • Quality factor (Q)
    • Dissipation factor (D)
    • Equivalent series resistance (ESR)

    How Inductance, Capacitance & Resistance Are Measured

    An LCR meter is an inductance, capacitance, and resistance meter that uses the same basic principle, which is the analysis of AC impedance, but presents the results differently, based on the behavior of the component to the signal applied to it. In this section, the extracting principle of each parameter is detailed according to the lcr meter working principle.

    How Resistance (R) Is Measured

    When a purely resistive component is tested:

    • Voltage and current remain in phase (0° phase angle)
    • There is no reactive component (no energy storage)
    • Impedance is equal to resistance

    The LCR meter calculates resistance using:

    • R = V / I

    The meter uses an AC signal even in measuring resistance. This enables it to sense parasitic inductance or capacitance which a DC multimeter would not, and makes the measurement more realistic of actual parts.

    How Capacitance (C) Is Measured

    For capacitors, the current leads the voltage, creating a negative phase angle.

    Measurement process:

    • The meter applies a known AC frequency
    • It measures voltage, current, and phase angle
    • Capacitive reactance is calculated:
      • XC = 1 / (2πfC)

    From this relationship, the meter computes capacitance:

    • C = 1 / (2πfXC)

    Since the capacitance depends on the frequency and dielectric losses, the LCR meters can be configured to use realistic and application relevant frequencies (usually 100 Hz or 1 kHz).

    How Inductance (L) Is Measured

    For inductors, the current lags behind the voltage, producing a positive phase angle.

    Measurement process:

    • The AC signal causes energy storage in a magnetic field
    • Inductive reactance is calculated:
      • XL = 2πfL

    The meter then determines inductance:

    • L = XL / (2πf)

    Higher test frequencies are often used to improve sensitivity, especially for small inductance values.

    Why This Measurement Method Matters

    By gauging the behavior of a component under AC conditions, an LCR meter provides:

    • More realistic values than DC testing
    • Higher accuracy for frequency-sensitive components
    • Reliable data for quality control, testing, and design

    Inductance, capacitance, and resistance are measured by observing how voltage and current interact under AC excitation, making the LCR meter an essential tool for precise electronic component analysis.

    Accuracy Factors in LCR Measurement

    Even the best LCR meter requires proper usage to achieve accurate results.

    Common Influencing Factors

    • Test lead length and quality
    • Stray capacitance and inductance
    • Component temperature
    • Calibration status

    High-end meters include open, short, and load compensation to eliminate systematic errors.

    Analog vs Digital LCR Meter Working

    Feature

    Analog LCR Meter

    Digital LCR Meter

    Accuracy

    Moderate

    High

    Ease of use

    Manual balancing

    Automatic

    Measurement speed

    Slow

    Fast

    Data display

    Scale-based

    Numeric + parameters

    Modern usage

    Limited

    Industry standard

    Due to efficiency and precision, digital models dominate today’s laboratories.

    Conclusion

    The working principle of an LCR meter is based on a simple yet powerful concept, which involves using a known AC signal and observing the response of a component. Through impedance and phase relation measurements, an LCR meter can accurately measure inductance, capacitance, and resistance, which are important parameters in modern electronics.

    Understanding the principles of lcr meter working is not only going to enhance the accuracy of measurements, but also assist the user to identify the correct instrument to use, prevent certain mistakes, and analyze the results properly. With the further development of electronics, tthe digital LCR meter working principle enables faster, smarter, and more reliable component testing of components in education, industry and research.

    FAQs

    An LCR meter is a device that uses a known AC test signal applied to a component and measures the impedance of the component which is the voltage, current and the phase angle. Based on these values, the meter determines whether the component behaves as a resistor, capacitor, or inductor and calculates its precise value.

    Inductance and capacitance are its frequency-dependents that cannot be accurately measured by DC. The AC signal enables the LCR meter to measure reactance and phase shift that is needed to calculate the values of L and C.

    The series mode applies in cases where resistive losses are the most important (usually when the inductance is small and the capacitors of interest are very low-value), whereas the parallel mode is used where leakage losses or parallel resistance are important (large capacitors).

    Since reactance varies with frequency, capacitor and inductor impedance vary with the test frequency. The loss and material properties also change with the frequency, which interferes with the measurement outcomes.

    Yes. An LCR meter measures resistance under AC impedance, and therefore is able to take into consideration parasitic inductance and capacitance which cannot be sensed in a DC multimeter, leading to further refined measurements of actual components.

    Tags: digital lcr meter working principle, lcr meter working, lcr meter working principle

    Gauss Meter Is Used to Measure What? Magnetic Field Explained

    TL;DR –

    • This blog is written for electronics engineers, technicians, students, educators, R&D professionals, and quality control teams who need a clear understanding of magnetic field measurement.
    • It explains what a gauss meter is used to measure, focusing on magnetic field strength and magnetic flux density in gauss or tesla units.
    • The blog breaks down gauss meter measurement principles, including how sensors and probes detect static (DC) and alternating (AC) magnetic fields.
    • It highlights real-world applications of gauss meters in electronics testing, magnet manufacturing, automotive systems, medical equipment, and research labs.
    • The blog emphasizes accuracy, proper usage, and correct selection of gauss meters to ensure reliable, safe, and consistent magnetic field measurements.

    Magnetic fields play a critical role in modern technology, even though they are invisible to the human eye. From smartphones, electric vehicles, and power supplies to medical equipment and industrial machinery, magnetic fields influence performance, safety, and reliability. Measuring these fields accurately is essential to ensure devices work as intended and comply with design standards.

    This is where a gauss meter becomes important. Many engineers, students, and technicians ask a simple but fundamental question: gauss meter is used to measure The answer lies in understanding magnetic field strength and how it affects electrical and electronic systems.

    In this detailed guide, we will explain gauss meter measurement, what a gauss meter is used to measure, how it works, its types, applications, and best practices. By the end of this blog, you will have a clear, practical understanding of magnetic field measurement and why gauss meters are indispensable tools across industries.


    Related Blogs


    What Is a Gauss Meter?

    A Gauss meter is a scientific and electronic measurement instrument used to measure the strength and direction of a magnetic field. It measures magnetic flux density, typically expressed in Gauss (G) or Tesla (T), where 1 Tesla = 10,000 Gauss.

    Gauss meters are widely used in electronics labs, physics experiments, industrial testing, research, and education to analyze magnetic fields generated by permanent magnets, electromagnets, motors, transformers, and electronic components.

    The unit of measurement used by a gauss meter is typically gauss (G) or tesla (T):

    • 1 tesla = 10,000 gauss
    • Gauss is commonly used for lower-strength magnetic fields
    • Tesla is used for very strong magnetic fields, such as in MRI systems

    When people ask gauss meter is used to measure what, the most accurate answer is:

    A gauss meter is used to measure the strength and sometimes the direction of magnetic fields.

    Understanding Magnetic Fields Measurement  

    A magnetic field is an invisible force field that surrounds magnets, electric currents, and changing electric fields. It represents the region where magnetic forces can be detected and measured. Magnetic fields are fundamental to how many electrical and electronic systems operate, from simple motors to advanced medical and industrial equipment.

    Magnetic fields are described by their strength and direction. Strength indicates how intense the field is at a given point, while direction shows the orientation of the magnetic force. These characteristics are commonly visualized using magnetic field lines, which emerge from the north pole of a magnet and enter the south pole. The closer the lines, the stronger the magnetic field.

    The key quantity used to describe magnetic field strength is magnetic flux density, measured in gauss (G) or tesla (T). This is precisely what instruments like gauss meters are designed to measure. Understanding magnetic fields and their behavior is essential for designing reliable electronics, ensuring safety, and maintaining consistent performance in real-world applications.

    What Does a Gauss Meter Measure?

    A gauss meter is a precision measurement instrument used to evaluate magnetic fields with high accuracy. It plays a critical role in electronics, electrical engineering, physics laboratories, manufacturing, and quality control, where understanding magnetic behavior is essential for performance, safety, and reliability.

    A gauss meter is designed to measure the strength and characteristics of a magnetic field. Its primary measurements include:

    • Magnetic field strength
      This indicates how strong the magnetic field is at a specific point. It is typically expressed in Gauss (G) or Tesla (T) and helps determine whether a magnetic source meets required specifications.
    • Magnetic flux density
      Magnetic flux density describes how concentrated the magnetic field lines are in a given area. This measurement is especially important in applications involving motors, transformers, and magnetic sensors, where field uniformity directly affects efficiency and performance.
    • Field polarity and direction
      Many modern gauss meters can identify whether the magnetic field is north or south oriented and detect its direction. This is crucial when aligning magnets, testing assemblies, or verifying correct installation in electromechanical systems.

    Static and Dynamic Magnetic Fields

    Depending on its design and sensor type, a gauss meter can measure both:

    • Static (DC) magnetic fields – typically produced by permanent magnets
    • Alternating (AC) magnetic fields – generated by coils, motors, and power systems

    Understanding whether the magnetic field is AC or DC is crucial for accurate gauss meter measurement and correct data interpretation, especially in diagnostics, quality control, and research applications.

    How Gauss Meter Measurement Works

    A gauss meter measures magnetic fields by detecting how a magnetic force influences an electronic sensor and converting that influence into a readable numerical value. The measurement process is designed to be precise, repeatable, and suitable for both laboratory and industrial environments.

    Sensor Principle

    Most modern gauss meters operate using a magnetic field sensor placed inside a probe. When the probe is exposed to a magnetic field, the sensor converts the magnetic signal into an electrical signal.

    Probe Orientation

    One of the most important factors in accurate gauss meter measurement is probe orientation. Magnetic fields have direction, and incorrect alignment can lead to inaccurate readings. Advanced gauss meters may use multi-axis probes to capture field strength in different directions simultaneously.

    Display and Output

    Digital gauss meters provide:

    • Instant readings on an LCD screen
    • High resolution and repeatability
    • Data logging and computer connectivity in advanced models

    Types of Gauss Meters

    Different applications demand different levels of accuracy, functionality, and field analysis. Understanding the types of gauss meters helps engineers, technicians, educators, and students select the right instrument for accurate magnetic field measurement.

    • Digital Gauss Meters

    Offer high accuracy, fast response, and an easy-to-read digital display. Widely used in laboratories, R&D, and industrial testing.

    • Analog Gauss Meters

    Based on older technology with limited accuracy. Mostly replaced by digital gauss meters in modern applications.

    • Single-Axis Gauss Meters

    Measure magnetic fields in one direction. Suitable for basic and routine magnetic field testing.

    • Three-Axis Gauss Meters

    Measure magnetic fields in X, Y, and Z directions, making them ideal for complex and non-uniform magnetic field environments.

    Why Accuracy Is Critical in Gauss Meter Measurement

    Accurate gauss meter measurement is essential because even minor errors in magnetic field readings can lead to serious technical and safety problems. Magnetic fields directly influence how electronic and electromechanical systems behave, and incorrect measurements can compromise performance, reliability, and compliance.

    In electronics, excess or uncontrolled magnetic fields can:

    • Interfere with sensitive circuits and signal integrity
    • Cause sensor malfunction or inaccurate feedback
    • Lead to overheating, efficiency loss, or premature component failure

    Precise gauss meter measurements help engineers identify and control these risks during design, testing, and quality assurance.

    Importance of Precision in Magnetic Field Measurement

    Accurate readings ensure:

    • Reliable and consistent product performance
    • Safety of equipment and users, particularly in high-power or industrial environments
    • Compliance with design specifications and industry standards, reducing rework and failures

    To maintain high accuracy, gauss meters must be properly calibrated, used with correct probe alignment, and operated under recommended measurement conditions. This disciplined approach ensures dependable magnetic field data across laboratories, manufacturing floors, and research environments.

    Gauss Meter vs Other Magnetic Field Measurement Tools

    Different tools are used to measure magnetic fields, but each serves a specific purpose. Understanding how a gauss meter compares with other magnetic field measurement instruments helps in selecting the right tool for the job.

    Tool

    What It Measures

    Best For

    Key Characteristics

    Gauss Meter

    Magnetic field strength in Gauss or Tesla

    Permanent magnets, motors, transformers, electronic assemblies

    High accuracy, fast response, ideal for lab and industrial testing

    Teslameter

    Magnetic field strength in Tesla

    Strong magnetic fields, research, high-power applications

    Similar to gauss meter but optimized for high-field measurements

    Search Coil Sensors

    Changing (AC) magnetic fields

    Dynamic magnetic field analysis

    Works on electromagnetic induction; not suitable for static (DC) fields

    Fluxgate Magnetometers

    Very weak magnetic fields

    Geophysics, navigation, Earth’s magnetic field studies

    Extremely sensitive; not commonly used for routine electronics testing


    Conclusion

    To summarize, a gauss meter is used to measure magnetic field strength or magnetic field, providing critical insights into how magnetic fields behave in real-world systems. From electronics and automotive engineering to healthcare and research, gauss meter measurement ensures accuracy, safety, and performance.

    Understanding what a gauss meter measures, how it works, and how to use it correctly empowers engineers, technicians, and students to make informed decisions and reliable measurements. As technology continues to advance, the gauss meter will remain a fundamental tool for exploring and controlling the invisible force of magnetism.


    FAQs

    A gauss meter is used to measure the strength of a magnetic field, specifically magnetic.It shows how strong a magnetic field is at a particular point, usually in gauss or tesla units.

    Gauss meter measurement means checking how strong a magnetic field is around a magnet, electrical device, or component, helping ensure safe operation and correct performance.

    Yes, many modern gauss meters can measure both DC magnetic fields from permanent magnets and AC magnetic fields produced by coils, motors, and power systems.

    Gauss meter measurement is widely used in electronics testing, magnet manufacturing, automotive and EV systems, medical equipment monitoring, and research laboratories.

    A gauss meter helps detect unwanted or excessive magnetic fields that can interfere with electronic circuits, sensors, and components, ensuring reliability and safety.

    Tags: gauss meter is used to measure, gauss meter measurement

    Choosing the Right Power Supply for Your Lab: A Beginner’s Guide

    An electronic lab cannot run without a dependable Power Supply. Whether you are a student assembling your first circuit, a hobbyist working on a microcontroller project, or an engineer setting up a university or small R&D lab, the correct power source can influence accuracy, safety, and the speed of learning.

    This guide categorizes the most important types of bench, programmable, and variable Power Supplies and provides real-world advice that is easy for beginners to understand, helping you choose the right unit for your specific requirements.

    Understanding the Importance of the Right Power Supply

    One of the most significant choices when establishing an electronics, R&D, or learning laboratory is selecting the right Power Supply. It is not just a device that delivers voltage; it is the foundation that ensures experiments are accurate, components remain protected, and prototypes behave as expected.

    From bench power supplies used for daily prototyping to programmable power supplies for automated testing and versatile variable power supplies for learning and experimentation, the options can feel overwhelming. This guide simplifies those choices so you can confidently select what fits your lab needs.

    Why the Right Power Supply Matters

    A power supply does more than deliver voltage. It provides a predictable and safe source of energy so measurements stay accurate and components remain protected. Using an incorrect or poorly specified supply can result in:

    • Unreliable measurements due to voltage ripple or noise
    • Damaged components from overcurrent or overvoltage conditions
    • Slower development cycles due to lack of repeatable testing features

    Choosing the right lab Power Supply dramatically improves safety, experiment reproducibility, and overall confidence while working.

    Main Types of Power Supplies

    Bench Power Supplies

    General-purpose desktop units with one or more outputs, intuitive manual controls, and features suited for education and prototyping.

    Programmable Power Supplies

    Designed for automation and R&D, these supplies support scripting, remote control (USB/LAN/GPIB), and precise repeatable outputs.

    Variable Power Supplies

    Focused on continuously adjustable voltage and current, making them ideal for teaching, experimentation, and learning circuit behavior.

    In practice, these categories often overlap. The key difference lies in where the emphasis is placed: convenience, automation, or learning flexibility.

    Key Specifications You Must Understand

    1. Output Voltage Range: Ensure it covers current and future project needs.
    2. Output Current Capacity: Choose 20–30% headroom over expected load.
    3. Power Rating: Determines suitability for high-demand applications.
    4. CV & CC Modes: Essential for stable and safe operation.
    5. Ripple & Noise: Low ripple is critical for sensitive electronics.
    6. Load & Line Regulation: Better regulation means higher accuracy.
    7. Number of Outputs: Single vs multi-rail system requirements.
    8. Display & Resolution: Improves precision and learning.
    9. Protection Features: OVP, OCP, OTP, and short-circuit protection.

    Programmable Power Supplies: When Automation Matters

    As projects become more complex, repeatability and automated control become critical. Programmable power supplies allow engineers and researchers to automate voltage/current profiles, run timed sequences, and log performance data with high accuracy.

    What Makes Them Different

    • Remote control via software or SCPI commands
    • Scripted voltage and current profiles
    • Higher precision and telemetry

    Example Use-Cases

    • Battery charge/discharge testing
    • Manufacturing test automation
    • Repeatable research experiments

    Beginner-Friendly Comparison

    Bench supplies suit hands-on learning, programmable supplies excel in automation, and variable supplies are ideal for experimentation and teaching.

    Safety Best Practices

    • Always verify polarity before connecting
    • Use current-limited startup for new circuits
    • Keep wiring organized to avoid shorts
    • Turn off supplies before major changes

    Maintenance & Calibration Tips

    • Ensure proper ventilation
    • Inspect connectors and leads regularly
    • Calibrate periodically for accuracy
    • Store in a clean, dry environment

    Final Recommendations

    Beginners should start with a 0–30V, 0–3A bench or variable supply with good protection features. For automated testing, invest in a programmable supply with suitable communication ports and scripting support.

    Conclusion

    Choosing the right Power Supply is an investment in safer, faster, and more accurate experimentation. As projects scale in complexity, programmable supplies help minimize errors and deliver consistent results.

    Nvis Technologies offers advanced engineering education, research, and lab solutions for universities, industries, and technical institutions.

    Tags: AI in Education, Digital Electronics, Experiential Learning, Future Skills, IoT in Schools., Renewable Energy Learning, Robotics, School Innovation, STEM education

    Choosing the Right Power Supply for Your Lab: A Beginner’s Guide to Bench, Programmable & Variable Units

    An electronic lab cannot run without a dependable Power Supply . Whether you are a student assembling your first circuit, a hobbyist working on a microcontroller project, or an engineer setting up a university or small R&D lab, the correct power source can influence accuracy, safety, and the speed of learning.

    This guide categorizes the most important types of bench, programmable, and variable Power Supplies and provides real-world advice that is easy to understand by beginners in order to make the correct selection of the appropriate unit that suits your requirements.

    Understanding the Importance of the Right Power Supply

    One of the most significant choices made in the establishment of an electronics, research and development, or learning laboratory is the choice of the Power Supply. A power supply is not just a machine that delivers a voltage but it is the base that makes sure your experiments are correct, components stay protected and prototypes behave as expected. As an engineering major, a hobbyist, or a professional researcher, the choice of the right unit has a direct influence on the performance, safety, and productivity.

    Whether it is bench power supplies that are intended to be used in everyday prototyping to programmable power supplies that are then used in automated test configurations, or even the very versatile Variable Power Supplies used for learning and experimentation, the choices can be daunting. This guide makes the choice of power supply easy enough in that you are sure to choose the most suitable power supply according to your specific laboratory needs.

    Why the right power supply matters

    A power supply does more than just deliver voltage. It provides a predictable, safe source of energy so that measurements are accurate and components are protected. Using the wrong type or a poorly specified unit can cause:

    • Unreliable measurements due to voltage ripple or noise.
    • Damaged components from overcurrent or overvoltage conditions.
    • Slower development cycles because you don’t have the features needed for repeatable tests.

    Picking the right lab Power Supply dramatically improves experiment reproducibility, safety, and developer confidence.

    Quick overview of the main types

    • Bench power supplies – general-purpose desktop units with one or more outputs, intuitive controls (analog knobs or digital interface), and features aimed at prototyping and education.
    • Programmable power supplies– designed to be controlled by a computer or test system; they support scripting, remote control (USB/LAN/GPIB), and precise, repeatable outputs for automated testing.
    • Variable power supplies – a category often overlapping with bench supplies; emphasizes continuously adjustable voltage/current so users can sweep values for experiments or teaching.

    Practically these categories are overlapping: a large number of bench supplies are variable, and a large number of programmable supplies are physically mounted on the bench. The distinctions are concentrations, i.e. manual convenience (bench), automation and repeatability (programmable), and variable range to learn and experiment (variable).

    Variable Power Supplies

    3 × 0–12V, 40A DC Power Supply – Nvis 1240P

    Nvis 1240P is a high-current, triple-output DC Power Supply designed for power electronics, motor testing, and advanced laboratory applications.

    Know More

    DC Programmable Power Supply – Nvis 1305P

    Nvis 1305P offers precise, programmable voltage and current control, making it ideal for automation, R&D, and long-duration test setups.

    Know More

    AC Power Supply – Nvis 230P

    Nvis 230P is a reliable AC Power Supply built for electrical experiments, AC circuit training, and controlled AC testing environments.

    Know More

    Key specs you must understand

    It is important to understand the specifications that directly affect performance, accuracy, and safety before selecting the appropriate Power Supply to use in your lab. These specifications define the extent of compatibility between the supply and your projects, component security and dependable and consistent power to test and experiment.

    1. Output Voltage Range

    This is the range of voltages the power supply can deliver (e.g., 0–30V). Choose a supply with a range that covers all your typical circuits, with additional headroom for future projects.

    2. Output Current Capacity

    Measured in amperes (A), this defines the maximum current the supply can deliver. Always select a supply with 20–30% higher current than your highest expected load to avoid stress or overheating.

    3. Power Rating (Wattage)

    Voltage × Current = Power. This tells you the total capability of the power supply. Higher-power units can support demanding loads like motors, RF circuits, or power electronic prototypes.

    4. Regulation (CV & CC Modes)

    Constant Voltage (CV): Maintains a stable voltage even if load changes.
    Constant Current (CC): Protects components by limiting current to a set value.
    Understanding how to switch between CV and CC is critical for safe testing.

    5. Ripple & Noise

    Even DC outputs contain small fluctuations. Low ripple and noise are essential for sensitive analog circuits, microcontrollers, and communication systems. High ripple can distort signals and affect measurement accuracy.

    6. Load & Line Regulation

    Load regulation: How well the voltage stays constant as the load varies.
    Line regulation: How stable the output remains when the input power changes.
    Better regulation means more precise results.

    7. Number of Outputs (Channels)

    Single-channel supplies are ideal for simple circuits, while dual or triple outputs are useful for powering multi-rail systems (e.g., 5V, 12V, -12V simultaneously).

    8. Display & Resolution

    High-resolution digital displays help you set voltage and current more accurately. This is especially important for precision testing, low-power circuits, and educational environments.

    9. Protection Features

    • OVP (Over-Voltage Protection)
    • OCP (Over-Current Protection)
    • OTP (Over-Temperature Protection)
    • Short-circuit protection

    Programmable power supplies: when automation and precision matter

    With increased complexity in electronics projects, repeatability, automated power control with high accuracy is needed. This is where the programmable power supplies differ with the traditional bench units. Engineers and researchers are able to automate voltage and current settings, run timed sequences and collect detailed performance information which significantly improves testing efficiency and reliability compared to manually adjusting knobs.

    Programmable supplies are particularly useful in laboratories that need uniformity in repeat cycles of a test, or where there is a need to test the behavior of devices under different power conditions.

    What makes them different

    • Remote control via software or SCPI commands.
    • Ability to run scripts that change voltages/currents over time (sweeps, ramps, profiles).
    • Often higher precision and richer telemetry (logging voltage, current, temperature).

    Features to prioritize

    • Communication ports compatible with your test setup (USB/LAN/GPIB).
    • Support for SCPI or a vendor API for scriptable control.
    • Fast transient response and tight regulation for power electronics testing.
    • Logging and built-in test sequences.

    Example use-cases

    • Battery testing with automated charge/discharge cycles.
    • Manufacturing test rigs where devices are validated through scripted tests.
    • Research experiments requiring repeatable, time-based voltage/current profiles.

    Comparison Table (Beginner-Friendly)

    CharacteristicBench Power SupplyProgrammable Power SupplyVariable Power Supplies
    Best forPrototyping, educationAutomated tests, R&DTeaching, experiments
    Manual controlExcellentPossible (less focus)Excellent (fine control)
    AutomationLimitedStrongLimited
    PrecisionGoodVery good / excellentGood
    Typical priceLow–mediumMedium–highLow–medium
    Safety featuresUsually includedAdvanced optionsUsually included
    Recommended whenYou want quick hands-on workYou need repeatable, scripted controlYou want to sweep and learn behaviors

    Safety best practices (non-negotiable)

    • Always check polarity before connecting; reverse polarity can destroy parts.
    • Use banana leads or safety-shrouded connectors for bench work.
    • Keep exposed connectors and wiring neat to avoid shorts.
    • Use current-limited startup when connecting new or unknown loads.
    • Turn off supplies before making major wiring changes.
    • For student labs: label rails and leave a prominent guide on safe operating ranges.

    Maintenance & calibration tips

    • Keep ventilation unobstructed—supplies generate heat.
    • Periodically inspect leads and connectors for wear.
    • Calibrate periodically if you need measurement-grade accuracy (institutional labs typically recalibrate annually).
    • Store in a dry, dust-free environment when not in use.

    Final recommendations

    If you’re just starting and need hands-on learning: buy a solid bench or variable power supply with at least 0–30V/0–3A and good protection features. This combination covers most student projects.

    If you plan to automate tests or need repeatable profiles: prioritize a programmable power supply with the communication ports you will use (USB or LAN) and scriptability (SCPI).

    For mixed needs (education + occasional automation), consider a mid-range programmable bench supply that offers both manual controls and remote interfaces.

    Choosing the right Power Supply is an investment in safer, faster, and more accurate experimentation.Most beginners find that a variable power supply with basic control features offers the best balance of flexibility, safety, and ease of learning, safety, and learning. The more sophisticated your projects are or the more automation that has been added, the more programmable supplies that can be added to your bench can assist in scaling your testing, minimize human error, and produce repeatable results.

    As a final note, Nvis Technologies offers advanced engineering education, research, and lab solutions for universities, industries, and technical institutions to universities, industries and technical institutions.

    Frequently Asked Questions (FAQs)

    1. What is the difference between a bench power supply and a variable power supply?

    A bench power supply is a general-purpose laboratory device used for everyday prototyping and testing.
    A variable power supply specifically allows users to continuously adjust voltage and current over a wide range,
    making it ideal for experimentation, learning, and testing circuit behavior under different conditions.
    Many bench supplies are also variable, but not all variable supplies are intended for advanced lab applications.

    2. How do I choose the right voltage and current rating for my power supply?

    First, determine the maximum voltage and current required by your project. Then add a 20–30% safety margin
    to ensure reliable operation and avoid stressing the power supply. For example, if your circuit requires
    12V and 1A, choose a unit rated for at least 15V and 1.3A or higher.

    3. When should I choose a programmable power supply instead of a basic bench unit?

    A programmable power supply is recommended when your work involves automation, SCPI scripting, or precise,
    repeatable power sequences such as battery testing, endurance testing, or automated production workflows.
    For general prototyping or student laboratories, a standard bench or variable power supply is usually sufficient.

    4. Why are ripple and noise important in a power supply?

    Ripple and noise are unwanted AC fluctuations present on a DC output. Excessive ripple can cause interference,
    unstable measurements, or malfunction in sensitive circuits such as ADCs, sensors, and RF modules.
    Low-ripple power supplies are essential for precision and analog electronics work.

    5. What safety features should I look for in a lab power supply?

    Key safety features include Over-Voltage Protection (OVP), Over-Current Protection (OCP),
    Over-Temperature Protection (OTP), and short-circuit protection. These features safeguard both
    your electronic components and the power supply, especially when testing new or unknown circuits.

    Tags: Power Supply, Power Supply Variable

    Top 5 technologies every school must invest in for a future-ready world

    Every generation grows up shaped by the skills and tools of its time. For today’s students, those skills are shaped by the tools and innovations they interact with every day; smart devices, automated systems, clean energy solutions, and intelligent apps that seem almost magical. What feels ordinary to them is actually their first step into the world of emerging technologies.

    In this environment, the classroom becomes more than a place to study concepts. It becomes a space where ideas can be tested, prototypes can be built, and questions can lead to real discoveries. When students experiment with a simple sensor, observe how sunlight powers a small device, or try coding a basic program, they are not just learning; they are understanding how the world works and how they can contribute to it.

    India’s push toward creativity, innovation, and experiential learning, as signalled in NEP 2020, makes it clear that schools must help students explore the technologies that will shape their future. Early exposure equips children with confidence, curiosity, and the ability to think in new directions.

    With this spirit of exploration in mind, here are the five technologies every school student should begin discovering to build a strong foundation for future learning and innovation.

    Top 5 Technologies Every Student Should Learn

    1. Artificial Intelligence (AI)

    AI is increasingly entering mainstream school education. With CBSE formally introducing AI as a skill subject and the National Curriculum Framework (NCF 2023) encouraging computational thinking from middle school onward, students today are engaging with AI earlier than ever. Even simple school-level projects, like image sorting, pattern recognition, or chatbot creation, help them understand how machines learn and make decisions.

    Why it matters for school students:

    • Builds computational and logical reasoning
    • Encourages responsible thinking around data and ethics
    • Helps students understand the technology shaping global innovation
    1. Robotics

    Robotics blends coding, electronics, mechanics, and design; making it one of the most engaging ways for students to learn by doing. Schools with robotics labs or innovation clubs see high student participation because robotics gives learners something tangible to build, test, and improve.

    Why it matters for school students:

    • Strengthens engineering thinking and creativity
    • Develops teamwork and real-world problem-solving
    • Reinforces science and math concepts through hands-on application
    1. Internet of Things (IoT)

    IoT helps students understand how “smart” systems work; devices that sense, connect, and respond. From smart home models to weather-monitoring setups, IoT projects are among the most common in school science fairs. It teaches students the fundamentals of hardware, software, and connectivity all at once.

    Why it matters for school students:

    • Builds systems and design thinking
    • Encourages real-life innovation
    • Introduces cybersecurity awareness and digital responsibility

    1. Renewable Energy & Clean-Tech

    Clean energy has become central to classroom discussions on sustainability, climate action, and responsible innovation. With India accelerating its renewable energy expansion, schools are increasingly encouraging students to explore solar kits, mini wind models, and energy projects. Clean-tech is now one of the most exciting domains for young learners, blending science with purpose.

    Why it matters for school students:

    • Nurtures environmental responsibility
    • Connects science concepts with global sustainability goals
    • Offers early pathways into emerging green careers

    1. Digital Electronics & Circuit Design

    Digital electronics gives students a hands-on understanding of how technology works at its core, from logic gates to simple sensors. It forms the foundation of robotics, IoT, and embedded systems, helping students develop confidence in building and troubleshooting basic circuits.

    Why it matters for school students:

    • Strengthens STEM fundamentals
    • Encourages experimentation and inquiry
    • Acts as a gateway to advanced technology learning

    Each of these technologies supports the development of critical skills such as analytical thinking, design logic, creativity, and digital literacy. When students begin exploring them early, it lays the groundwork for deeper STEM engagement as they progress through their schooling. These skills do not develop in isolation, they grow through consistent exposure, exploration, and guided experimentation. That is why introducing these technologies early becomes essential.

    Why Schools Should Introduce These Technologies Early

    When students experience technology through building, experimenting, and solving problems, they develop habits of curiosity and confidence. Early exposure to these fields:

    • Makes learning more meaningful and connected
    • Builds higher-order thinking and creativity
    • Improves comfort with STEM subjects
    • Helps students discover interests that may shape future careers

    These technologies help shape future problem-solvers and innovators. While the need for these technologies is clear, schools often require practical, student-friendly learning tools to implement them effectively.

    Making Technology Learning Practical & Accessible

    Nvis Technologies is a leading provider of STEM education tools, school lab solutions, and hands-on learning systems that make technology accessible and engaging for young learners.

    • Ready-to-use STEM kits
    • Training systems for robotics, electronics, IoT, and renewable energy
    • Activity-based learning tools for interactive classrooms
    • Curriculum-aligned resources that support teachers in delivering practical learning

    Nvis empowers schools to introduce complex technologies in simple, practical, and interactive ways.

    Building Tomorrow’s Innovators Today

    Students today do not just want to understand technology; they want to build it. By introducing these technologies early, schools help students develop curiosity, creativity, and future-ready skills.

    With Nvis Technologies as a learning partner, schools can turn classrooms into spaces where ideas come alive and students grow into confident creators and innovators.

    Explore school-ready lab solutions from Nvis Technologies.

    Tags: AI in Education, Digital Electronics, Experiential Learning, Future Skills, IoT in Schools., Renewable Energy Learning, Robotics, School Innovation, STEM education